Recently I acquired one of these cheap Windows tablets and it's a really beautiful and powerful device.
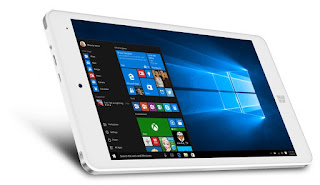 |
| Image Copyright © 2016 CHUWI |
It does have problems however, namely:
- No drivers for any other OS than Windows 10 exist
- Display has slight burn-in after long use
- Doesn't charge when using an USB Hub adapter
- SD card reader malfunctions
- Poor sound quality
These types of problems seem to occur across different brands (going by the many threads on tech forums) and are to be expected with products coming from cheap manufacturers, as is the case with Chuwi, Teclast, Onda etc. however for the price (~$80) you really can't complain. The Android side of things plays any game you can throw at it fluidly and the Windows side is powerful enough to do serious browsing and edit Excel spreadsheets without a problem.
In this article I will post solutions to the problems I encountered in the hopes it will be helpful for you as well.
Specifications
CPU Intel Atom X5 Z8300 @ 1.44GHz Cherry Trail 14nm Technology
RAM 2.00GB DDR3 @ 800MHz (11-11-11-28)
Motherboard Hampoo Cherry Trail CR (SOCKET 0)
Touchscreen LT080B21BA138 (1920x1200@50Hz)
Graphics Intel HD Graphics (max 50Hz)
Storage 32GB Generic NCard (eMMC)
Audio Intel SST Audio Device (WDM)
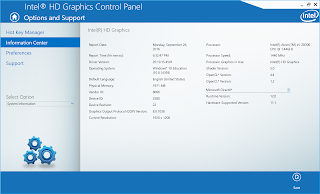 |
| Intel HD Graphics Control Panel info |
My tablet contains both Android (x86_64) and Windows 10 (x86) on its tiny 32GB eMMC drive meaning free space is very scarce but you can add an additional microSD card which circumvents this issue, not to mention the tablet reads cards at full speed (when it does read them).
Chuwi has recently released a new version of the Hi8 Pro containing a 64 bit Windows 10.
Useful links and downloads
Chuwi Forums
Official Chuwi Hi8 Pro downloads
OEM files and Windows/Android OS switcher (SwitchNow.exe)
Chuwi Hi8 Pro Drivers (32 bit)
Things to know
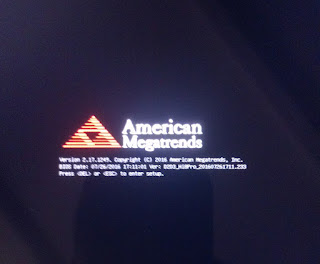 |
| Booting with Quiet Mode disabled shows bios info at the start |
How to access the UEFI Bios:
You need an USB Type-C adapter and a wired USB keyboard. Power the tablet on and press
DELETE or
ESC when the CHUWI logo first appears.
How to reset Bios to Factory Settings:
Plug in the tablet. While powered-off press the
POWER button until the blinking red light stops and disappears (usually a good 15 seconds of pressing). The device will reboot a few times, let it do its thing. After the OS selection screen appears the bios has been reset to factory default.
How to enter the Android bootloader:
To enter Android bootloader mode, first select Android in the OS
switcher at the start then upon seeing the CHUWI logo press and hold
VOL DOWN until you see a screen with the green Android robot pop-up. From this screen you can access recovery by scrolling modes with
VOL UP or DOWN if needed.
How to enter DNX FASTBOOT MODE:
Power the table on, when you see the Chuwi logo press
VOL UP + VOL DOWN simultaneously until DNX FASTBOOT MODE shows up in yellow letters on the screen.
Disclaimer and warnings
I can not be held accountable for any damage you do to our device, you do anything described here AT YOUR OWN RISK.
ALWAYS MAKE SURE YOUR TABLET HAS A FULL BATTERY BEFORE ATTEMPTING ANY OF THIS OR YOU MAY BRICK IT.
How to update Bios
Updating the bios is fairly straightforward:
Things you will need:
- A USB flash drive
- A USB Hub
- A USB keyboard
-
Chuwi bios files for your device
1. Create a bootable USB flash drive:
Connect your USB flash drive and format it to
FAT32. It must be named WINPE otherwise the tablet will not boot from it.
2. Put the bios files on the flash drive:
 |
| Chuwi bios files |
3. Boot into the flash drive:
Power on your table with the flash drive and keyboard connected, then press F7 to access the boot menu. There choose your flash drive and let the program do its thing.
Note: If you can't boot into the flash drive, go into the bios > Start&Exit tab > select Reset System with ME disable Mode MEUD000. After the device reboots, press F7 to access the boot menu and try again.
Rooting Android and installing a recovery
The first thing you might want to do is root Android and install a recovery mode like TWRP, for this you can follow
this handy guide by the user klop8093 on the Chuwi forums.
If you follow the guide to the letter it works perfectly.
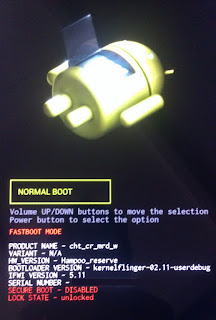 |
| Android Bootloader |
One thing to note is that Xposed Framework does not currently work, the device will be stuck in a boot loop until you go into recovery and uninstall Xposed so make sure you download the uninstaller to internal memory if you plan on trying your luck.
Installing Windows 10
While the tablet already comes with Windows 10 Home pre-installed you might want to wipe the disk to make it
single boot or maybe install an
upgraded version of Windows 10.
To do this you will need:
-
Media Creation Tool to download the Windows 10 ISO
- A USB flash drive with at least 4 GB space
- The program
Rufus to create a bootable flash drive
- A USB Type-C hub to connect the USB flash drive and mouse / keyboard
You don't require a valid Windows key to install as the setup will check for valid manufacturer certificates from the UEFI automatically. If you install another version other than
Windows 10 Home you will need one however.
0. Check your Hi8 Pro Serial Number:
At the back of your tablet should be a series of numbers, check if they match the description:
32-bit versions:
PQ32G221603XXXXX up to PQ32G221607XXXX
64-bit versions:
PQ32G221608XXXXX and up
1. Download the Windows ISO:
Using Microsoft's
Media Creation Tool select "Create installation media for another PC":
Then select the type of ISO you want, make sure it's 32bit or 64bit Windows depending on your serial number:
After it's done downloading select
ISO file to save the ISO file to your PC and close Media Creation tool.
2. Create a bootable USB flash drive:
Now connect your USB flash drive and launch
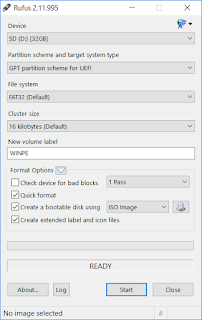
Rufus:
 |
| Rufus |
First select the Windows ISO you just downloaded by clicking the small disk drive icon.
Then make sure you select
GPT partition scheme for UEFI under "Partition scheme".
Under "File system" select
FAT32.
Finally it's important that the flash drive be named
WINPE in "New volume label" otherwise it will not boot.
Press
Start and wait until it finishes.
3. Booting into the Windows Setup:
With your flash drive inserted, power on the tablet and press
DELETE or
ESC on your keyboard at the start to access the bios menu.
In the bios go to
Save & Exit tab and select the flash drive you just created to boot into the Windows setup.
4. Installing Windows
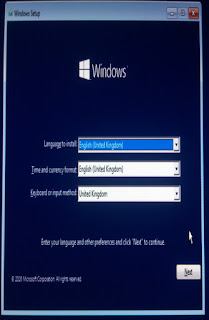
If everything went right you should be greeted with this screen:
 |
| Windows 10 Setup |
Select your languages and keyboard and proceed until you get to this screen:
Here you can choose whether to upgrade your currently installed Windows version or to install a new Windows. We're going to pick the second option "
Custom: Install Windows only (advanced)".
You will get to this screen with all the partitions currently existing on the tablet. Scroll all the way down and you will see a partition named
Reserved or
MSR (Reserved). You can delete all the partitions on the way down, Reserved included, to make space for a new Windows install.
After deletion, select the empty partition partition and press
Next. Windows will install and reboot after it has finished.
Note: Do not touch or format the first two partitions on the disk including ANDROIDIA or you will lose the OS switcher and won't be able to boot into Windows.
Creating a Windows Only Tablet:
This partition screen will also allow you to delete all the Android partitions going from the one named
ANDROIDIA all the way to the bottom, allowing you to install Windows only and gain precious disk space.
Installing GNU/Linux
I haven't messed around too much with this and the one time I tried to boot Ubuntu it failed before it reached the desktop. While not exactly impossible it is hard to use due to lack of drivers.
See:
Vi8 and
Hi8 on Github for a guide and more info.
Installing Windows 8 / 8.1
Installing 8 / 8.1 is certainly possible (follow the guide above just like for Windows 10) but a lot of peripherals will not work due to a lack of drivers. All the drivers provided by Chuwi didn't work for me, not the ones for the Vi8 or Hi8 (which originally came with Windows 8 installed) or the Windows 10 drivers.
The tablet's Wifi will not work at first so you will need an additional Ethernet or Wifi adapter to access the internet. Or you could use your phone's Wifi connection as tether.
Sadly, while I prefer Windows 8 to Win 10 it's pretty much a waste of time trying to get it to work unless you don't care about using the touchscreen, wifi, bluetooth etc. You're better off installing Windows 10.
Installing Android
Note: If you install Android from scratch (flash.json) then it will erase everything on the disk and make new partitions, this means your Windows install will be gone and you will have to reinstall it again, either using the Chuwi Windows image or by using the tutorial in this article.
Note 2: Updating Android (flash-no-erase-all.json) doesn't delete Windows but you will have to root and install TWRP again. See the official Chuwi guides for reference.
Note 3: It is possible to install TWRP directly during the flash process by replacing boot.img and recovery.img with the ones in the TWRP package available in this guide.
Things you will need:
- A second computer
- An
Android image provided by Chuwi
-
Intel Android PhoneFlashTool for Z8300 Devices
-
Intel Android USB Drivers
First of all install the
Intel Android USB Drivers so the tablet gets recognized by your computer.
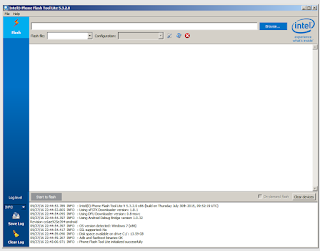
Secondly launch the
PhoneFlashTool and browse for the Android image you downloaded, select either
flash.json to erase everything or
flash-no-erase-all.json to update Android:
 |
| PhoneFlashTool |
Now you want to connect your tablet through USB and enter
DNX FASTBOOT MODE, to do this power off your tablet then power it on again and press
VOL UP + VOL DOWN simultaneously when you see the Chuwi (or Bios) logo until DNX FASTBOOT MODE shows up on the screen in yellow letters.
If the tablet shows up in PhoneFlashTool and everything looks green, press flash to start the process making sure
recover is selected under
Configuration.
Let the whole process finish until it says Flash Successful.
Updating Android:
To update Android you will need to enter the Android bootloader first. When you're in the bootloader and the tablet is recognized in PhoneFlashTool, select
update under
Configuration and then press Start Flash.
SD card is not detected (hardware)
The SD card reader seems to be faulty at times in that it doesn't detect any SD card inserted into the tablet. The reason for this is a small pin not making contact on the reader and thus the card not being detected. To fix this you will have to open up the tablet,which thankfully is very easy (only 4 small torx screws). The SD card reader is located at the top of the motherboard:
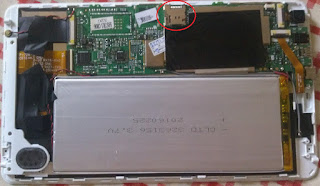 |
| How it looks like inside, the SD card reader is circled in red |
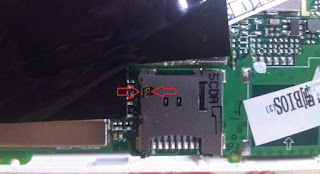 |
| Both these small pins must touch for the card to read |
With a small contraption to make both pins touch and some tape, we manage to get it working 100% of the time:
 |
| Hey! it works... :-) |
SD card is not detected (software)
This is an
on-going problem that seems to be plaguing a lot of Cherry Trail devices. It could be a Windows issue (update KB314935 related?), it could be a faulty driver issue, it could be an hardware issue. I guess nobody really knows and the manufacturers keep silent.
Note: It almost certainly is NOT an issue with your type or brand of SD card or how it is formatted, although I'm not saying your card couldn't be faulty.
Partial fix:
In the Bios go to
Advanced > System Component and change
OS IMAGE ID to
Windows.
Then right above that change
MS Custom Sdbus Driver to
Enabled. Make sure you save your Bios changes.
Then back in Windows 10 go to
Device Manager and see if
SD Storage Class Controller is properly installed and working:
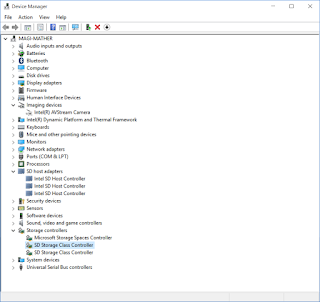 |
| SD Storage Class Controller |
If you need drivers, I uploaded them here:
SD Card Drivers. Right-click
SD Storage Class Controller and select
Update Driver Software... then
Browse my computer for driver software and select the folder with drivers you downloaded.
With this change the SD card reader seems to work fine for a while but once you boot into Android it might be faulty again, sometimes even rebooting into Windows doesn't make it work 100% of the time.
Options to explore:
Chuwi has released
a bios update that's meant to fix the issue but it really doesn't do much for me.
Using the May bios also seems to break the Bluetooth on Windows (if you didn't update to version 1607 that is) and the card is still not properly detected. If you want to try this bios and still have working Bluetooth you can check this
thread on the Chuwi forums by user Loz.
Charging and using a USB Hub / OTG
The Hi8 Pro provides sufficient power for an OTG adapter but it drains a lot of battery.
Of
the two USB 3 Type-C hubs with charging I've tried so far none allowed
the device to charge, only to slow down battery loss. This is a problem
if you want to use a wired keyboard and mouse on Windows for a prolonged
period of time. Thankfully Bluetooth exists.
The Chuwi charger that comes with the Hi8 Pro outputs 5V at 2 amps and the tablet charges fairly quickly to 100% if powered-off.
Interesting Bios settings to consider:
In the Bios go to
Chipset > South Bridge > USB Configuration, you will be met with the following screen:
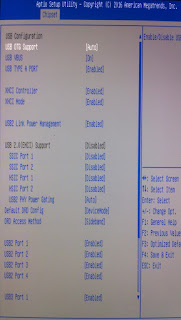 |
| USB Bios settings |
USB OTG Support: OTG allows two USB
devices to talk to each other, it's especially useful on Android if you
want to connect flash drives. Note however that Android will
not boot if OTG is set to disabled.
USB VBUS:
If you disable this the tablet will no longer power external USB / OTG
devices. Could this be used to make the tablet recharge while using a
USB hub? So far no success.
DO NOT DISABLE USB TYPE A
PORT or your USB keyboard will stop working and you will have to reset
to factory settings to access the bios again.


